Dimraeth The BEST Possible Start for NEW Players Strongest Build Best Stat Allocation and Skill Tree
 Watch on YouTube
Opens the video on YouTube. Nothing loads from YouTube until you click.
This page sums up Dimraeth The BEST Possible Start for NEW Players Strongest Build Best Stat Allocation and Skill Tree by SwoleBenji. Each line links to the moment in the video it comes from.
What the video covers
- A Minotaur Brawler starter, played on Moderate difficulty. The uploader picks it because the wide axe swings clear whole packs, and it gets through the first three chapters without good gear. 3:11
- Before you start, turn on auto sprint outside combat. Set the lobby to private too, or other players can take items from your chests. 4:01
- In combat, put a Quick Jab between basic attacks. The jab cancels the swing animation. 5:47
- Every attribute point goes into Strength when you train at a campfire. 14:08
- Before you take quests in the first zone, run around it for the map fragments, waygates and Shrines of Encumbrance. One shrine in the video raises carry weight from 300 to 315. 16:35
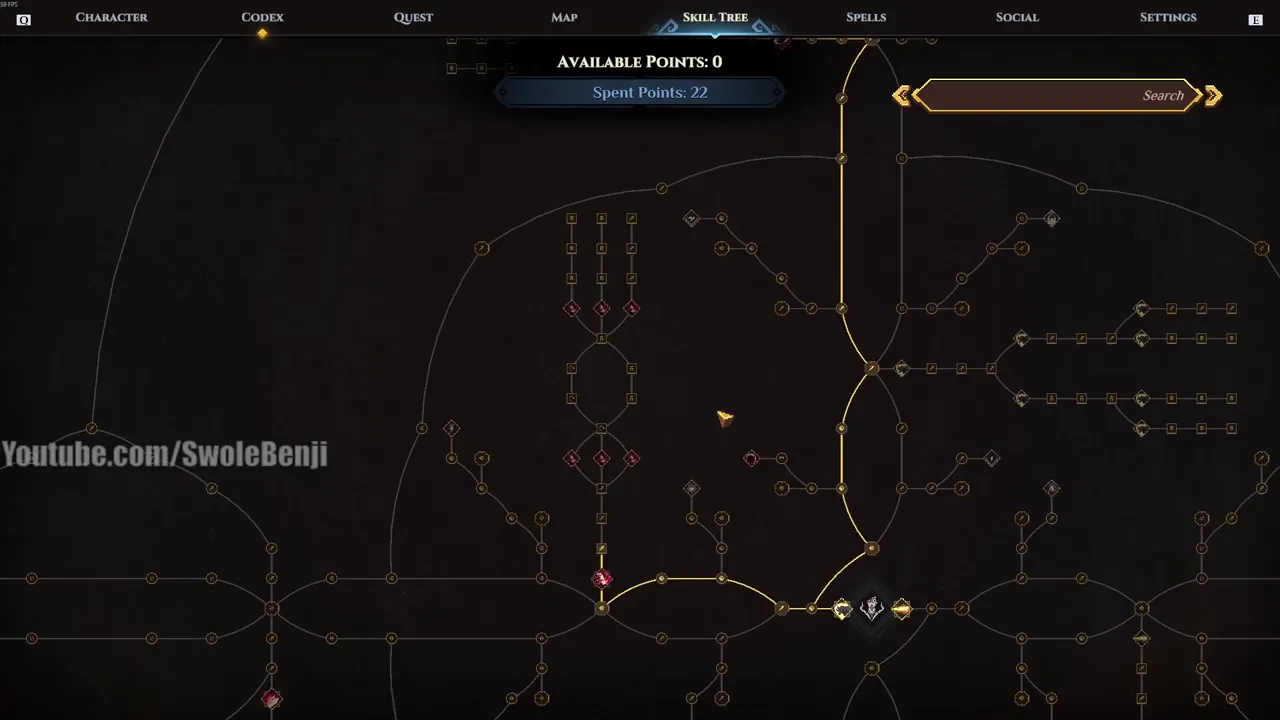
- The first skill points go up the Minotaur line to
 Vortex and
  Repeating Vortex. 23:32
 - In town, salvage the gear you do not wear and spend the shards upgrading the pieces you do. 29:37
- After Repeating Vortex, go back to the start and take the Brawler line up to
 Furious Strike,
  Repeating Strike and
  Rending Strike. 41:12
 - Once the base has an alchemy table, upgrade your
 Weak Health Extract with Tenderberries before the bosses. The uploader ends up with seven charges. 46:18
 - At level 10 or 11 the character beats the optional wolf boss, then the Corrupted Treant of
 The Corrupted Beast. For a hard fight, the uploader spins through the enemies twice, backs off and waits for the cooldowns. 53:39
 - From 1:00:00 the video plans the rest of the tree up to level 25. It adds Rending Strike, Whirl of Gore, Enraging Vortex and Rending Charge, then whatever Bleeding nodes the tree search turns up. 1:00:00
Screens from the video
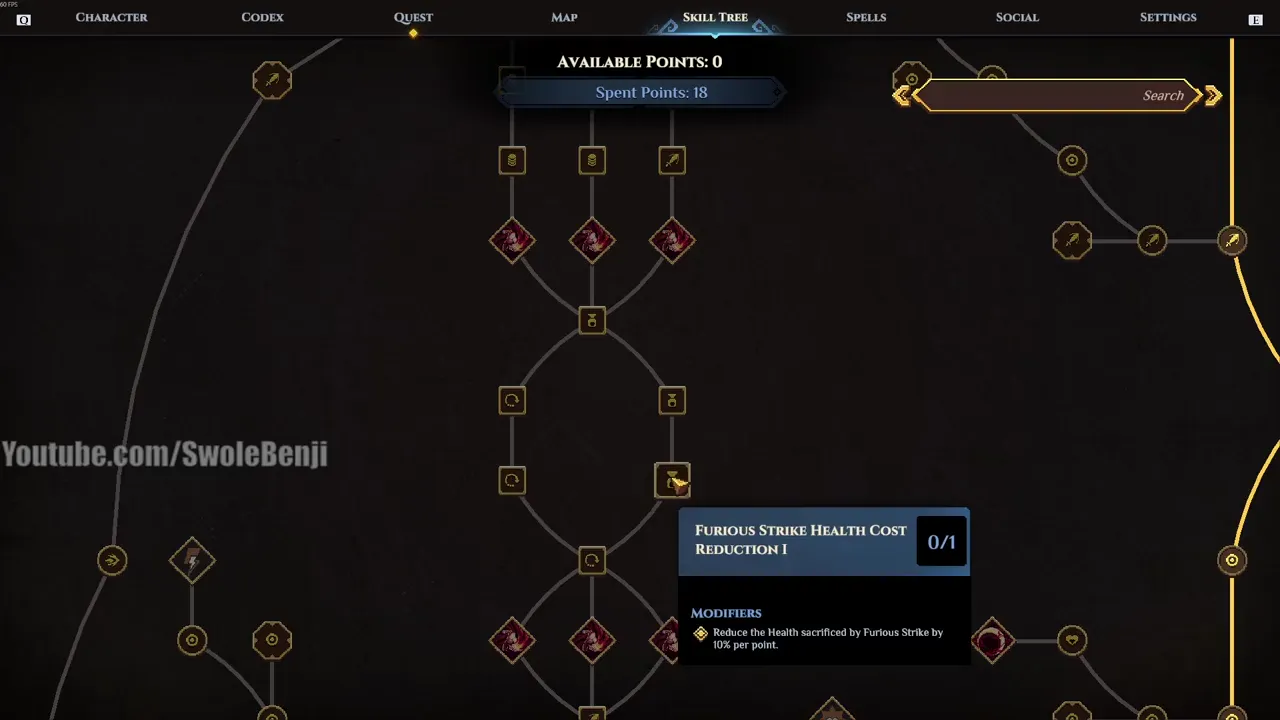
 Furious Strike Range Increase I. 42:10
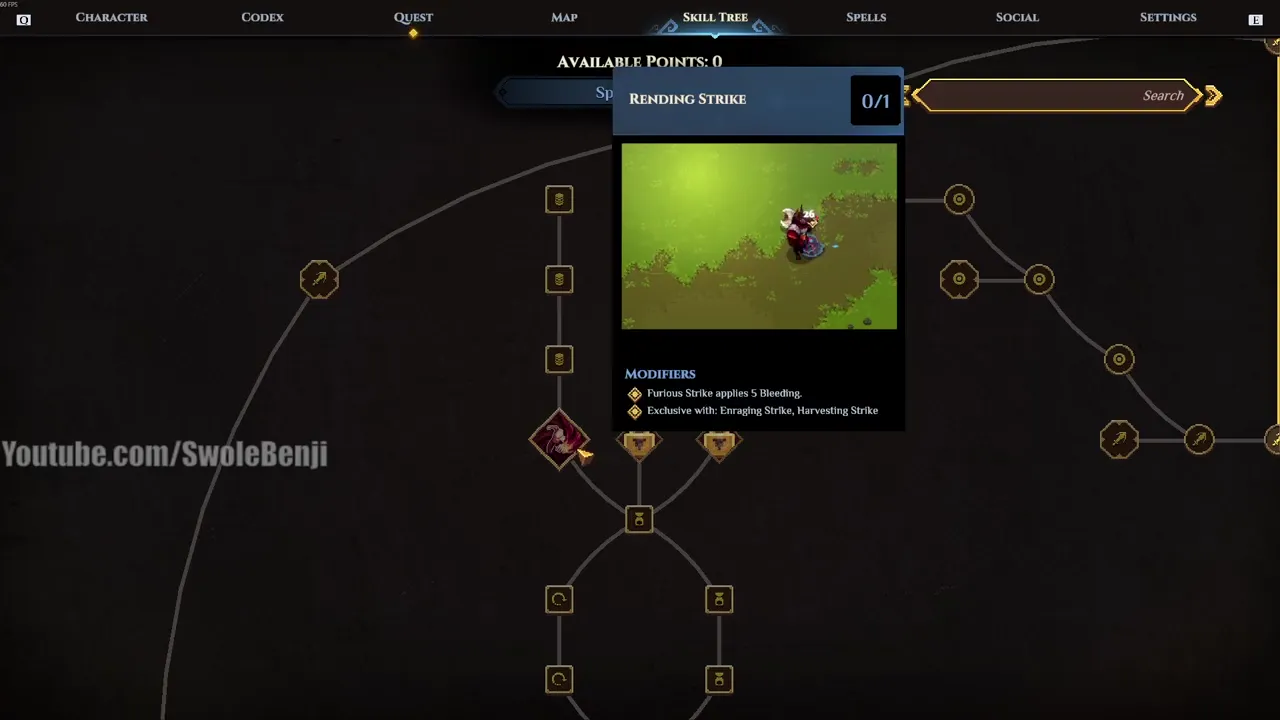 Rending Strike, which makes Furious Strike apply 5 Bleeding. 42:30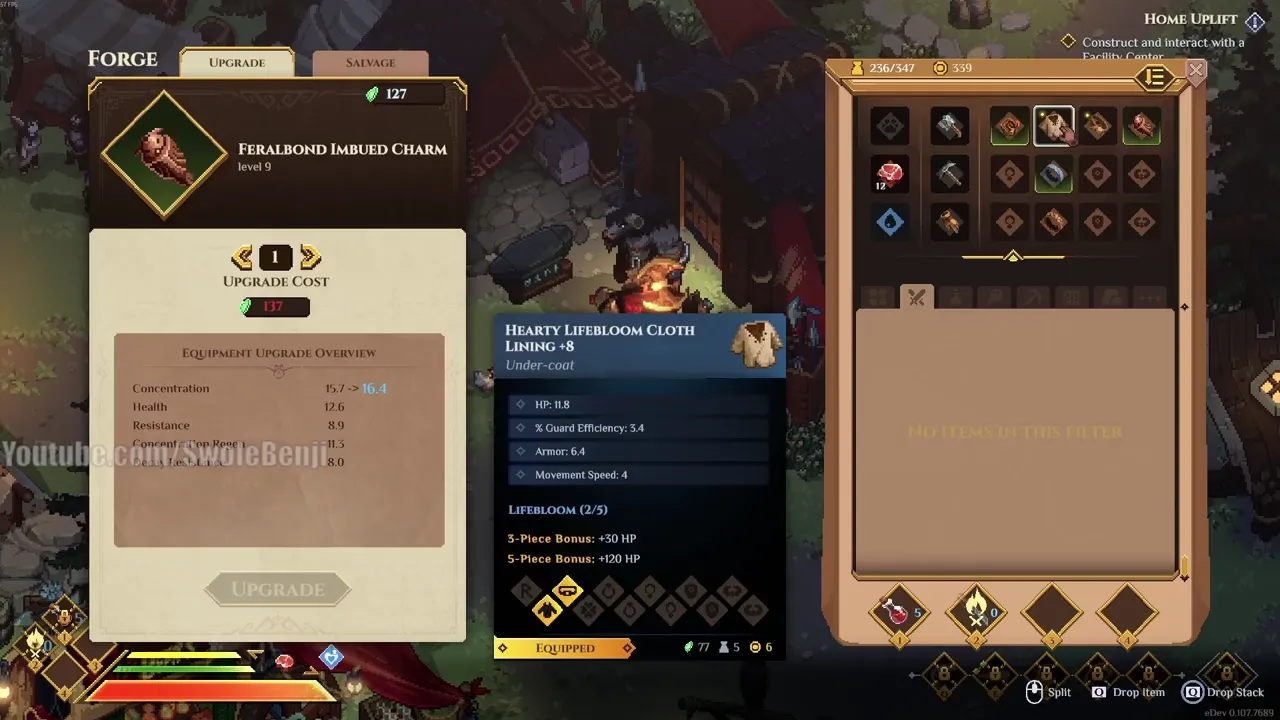
 Lifebloom undercoat, with the equipped grid on the right. 59:33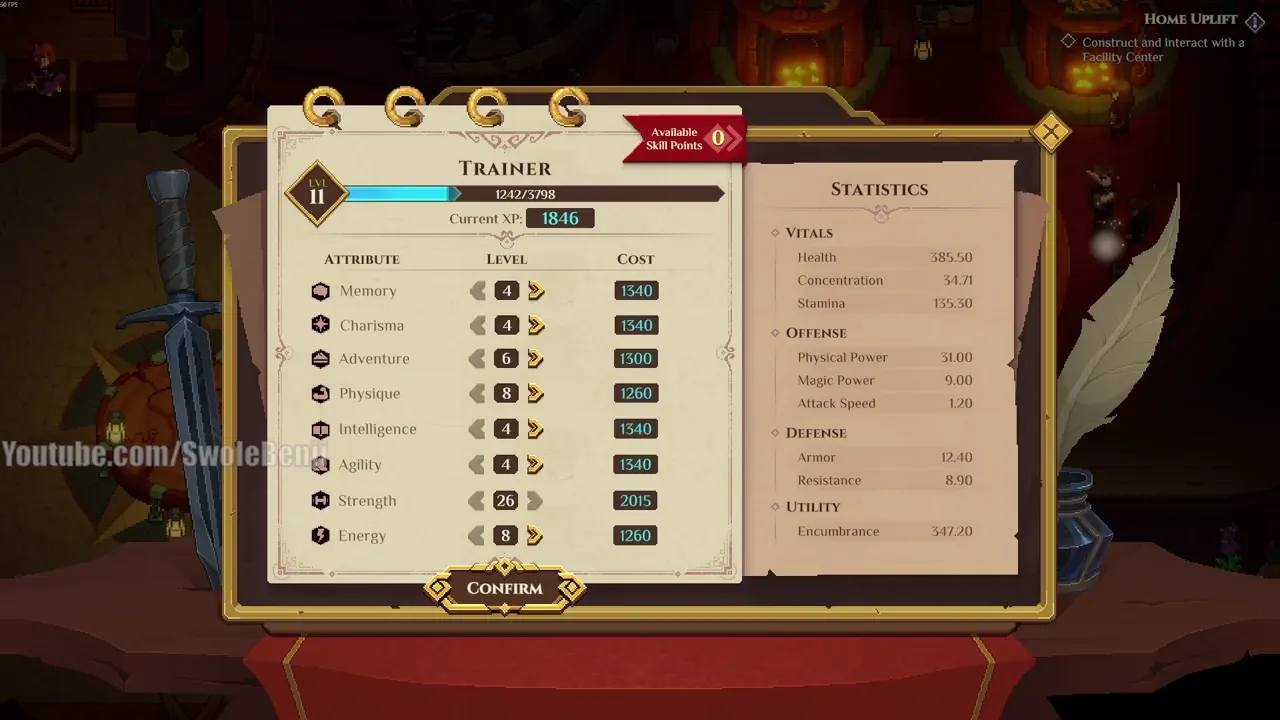
The build
Open this build in our planner
The planner opens with the nodes below already bought.
Skill tree nodes
The video takes these 56 nodes, in this order.
 Health Boost 23:42
 Health Boost 23:47
 Health Boost 23:52
 Health Boost 23:55
 Minotaur Blood 24:00
 Attack Speed Increase 24:05
 Attack Speed Increase 24:08
 Attack Speed Increase 24:08
 Bovine Fervour 24:08
 Max Bleeding Increase 24:08
 Max Bleeding Increase 24:08
- Vortex 24:12
 Vortex Damage Increase I 24:20
 Vortex Damage Increase II 24:20
 Vortex Damage Increase III 24:20
- Repeating Vortex 24:20
 Strike Damage Increase 41:24
 Health Boost 41:24
 Health Boost 41:24
 Berserker Blood 41:30
- Furious Strike 41:30
 Furious Strike Damage Increase I 41:36
 Furious Strike Damage Increase II 41:36
 Furious Strike Damage Increase III 41:36
- Repeating Strike 41:36
 Furious Strike Cooldown Decrease I 42:00
- Furious Strike Range Increase I 42:10
 Furious Strike Range Increase II 42:12
 Furious Strike Range Increase III 42:12
- Rending Strike 42:25
 Rending Strike Increase I 1:00:12
 Rending Strike Increase II 1:00:12
 Rending Strike Increase III 1:00:12
 Max Bleeding Increase 1:00:34
 Max Bleeding Increase 1:00:34
 Child of the Bloodhorn 1:00:35
 Whirl of Gore 1:00:40
 Vortex Cooldown Reduction I 1:00:56
 Vortex Cooldown Reduction II 1:00:56
 Vortex Cooldown Reduction III 1:00:56
 Enraging Vortex 1:00:56
 Enraging Vortex Increase I 1:01:00
 Enraging Vortex Increase II 1:01:00
 Enraging Vortex Increase III 1:01:00
 Cornu Shockwave 1:01:35
 Cornu Shockwave Size Increase I 1:01:35
 Cornu Shockwave Size Increase II 1:01:35
 Cornu Shockwave Size Increase III 1:01:35
 Bloodscent Charge 1:01:40
 Cornu Charge Cost Reduction I 1:01:49
 Cornu Charge Cost Reduction II 1:01:49
 Cornu Charge Cost Reduction III 1:01:49
 Rending Charge 1:01:49
 Rending Charge Increase I 1:01:57
 Rending Charge Increase II 1:01:57
 Rending Charge Increase III 1:01:57
Attributes
Shown in the video 59:47
Gear
The stat values follow the game's forge rule for each piece's stars and forge level. The planner uses the same rule.
- Rune ·
 Swiftstep · Uncommon · 2 stars · +8 (forge level 9) 59:32
Main stat: 11.8 Strike Damage
Extra stats: 6.3% Physical Damage, 4.5 Physical Piercing, 11.3 Stamina, 8 Thrust Damage - Under-coat · Lifebloom · Common · 1 star · +8 (forge level 9) 59:33
Main stat: 11.8 HP
Extra stats: 3.4% Guard Efficiency, 6.4 Armor, 4 Movement Speed - Belt · Lifebloom · Common · 1 star · +8 (forge level 9) 59:33
Main stat: 11.8 HP
Extra stats: 2.2 Encumbrance, 6.4 Decay Resistance, 6 Armor - Charm ·
 Feralbond · Uncommon · 2 stars · +8 (forge level 9) 59:34
Main stat: 15.7 Concentration
Extra stats: 12.6 HP, 8.9 Resistance, 11.3 Concentration Regen, 8 Decay Resistance - Ring 1 ·
 Momentum · Uncommon · 1 star · +5 (forge level 6) 59:35
Main stat: 7.8 Strike Damage
Extra stats: 5.6% Attack Damage, 3.2 Physical Piercing, 3 Attack Speed - Ring 2 ·
 Tidestorm · Common · 2 stars · +5 (forge level 6) 59:36
Main stat: 6.9% Physical Damage
Extra stats: 11.3 HP, 8 Ether Resistance
Pet and spell bar
Rotation
 Quick Jab Weave Quick Jab between basic attacks to cancel the slow part of the swing. 5:47
 Heavy Strike Tap Heavy Strike and weave it in the same way. The uploader says holding its charge loses damage. 13:49
 Furious Strike With Repeating Strike, a kill resets the cooldown of Furious Strike, so you can chain it through a pack you one-shot. 41:36
 Vortex For a tough pack, cast Vortex through them twice (Repeating Vortex allows the second cast), then back off until the cooldowns are ready again. 55:30
 Stone Throwing Knife On bosses, throw a
  Stone Throwing Knife to add Bleeding, stack your own Bleeding, and step out of the boss's area attacks while the Bleeding does the damage. 50:58
Notes from the video
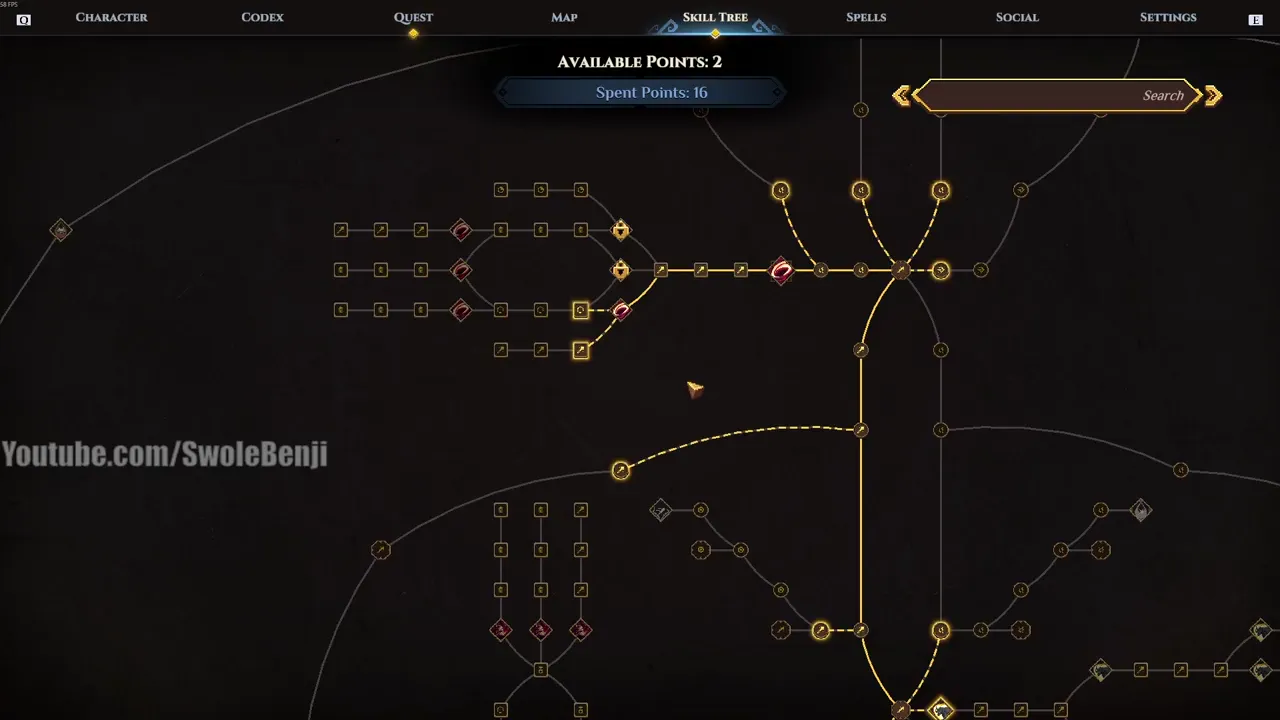
- At 1:00:15 the tree shows 22 spent points. 16 go up the Minotaur line to Repeating Vortex and 6 go up the Brawler line to Furious Strike Damage Increase I. This is the character at the end of the first chapter, at level 11. 1:00:15
- The nodes the video names cost 56 points. Level 25 gives 48 (2 per level after the first), so the planner link counts 8 more from first boss kills. The game gives 1 point for each of 12 bosses. The video never adds up the points. 1:00:24
- The video takes Furious Strike Cooldown Decrease I and then the Health Cost Reduction nodes up to Rending Strike. It does not say whether Cooldown Decrease II and III are taken, so the link leaves them out. 42:00
- The video does not name Cornu Shockwave Size Increase I to III, Cornu Charge Cost Reduction I to III or Vortex Cooldown Reduction I to III. The link includes them because they are the only path to Bloodscent Charge, Rending Charge and Enraging Vortex. 1:01:35
- The video says putting everything into Strength builds stamina only on the Minotaur Brawler. The game files agree, since the Horned Vanguard passive gives 2.5 Stamina per point of Strength. 27:04
- The video says one Rage gives 2% more damage, and that a maxed Enraging Vortex gives 5 Rage per enemy hit. The 5 is right: Enraging Vortex gives 2 Rage per enemy, and each of the three Enraging Vortex Increase nodes adds 1. The 2% is only part of it. Each Rage stack adds 2% Physical Damage, and the damage code adds another 3% to each physical hit per stack. Rage stops at 10 stacks unless nodes raise the cap. 1:01:01
- Three Lifebloom pieces give +30 Health in the video, and the game files agree (5 pieces give +120). 17:48
- The video passes on the 2-piece Pitfighter bonus because percent bonuses are small this early. In the game files that bonus is +3% Health and +5% Physical Damage. 18:08
- The video calls Savage Claw a set. In the game files
 Savage Claw is a spell from a spellbook (5
  Alpha Claw, 5
  Dryad Eye, 3
  Rough Paper). The set is
  Brutalclaw. With 3 pieces, Savage Claw applies 5 more Bleeding, and with 5 pieces it deals 33% more damage. 53:57
 - At 34:29 the uploader says to switch to 8 Agility once basic attacks one-shot slimes and goblins. At 1:00:23 the advice changes to Strength for the whole game, with Agility only to learn spells. 34:29
- The video's heal values match the game files, 150 for a Weak Health Extract and 450 for a Lesser Health Potion. Both heal over 4 seconds and refill when you rest. 1:05:56
- The
 Recipe Stone Throwing Knife costs 15 gold in the video, the same price as in the game files. 1:05:46
 - The pet from the second wolf fight (Beast Occupied Ruins) deals Strike Damage and applies Bleeding and Chill. That matches the
 Fangra Cub in the game files. 1:05:01
 - At the end of the first chapter (level 11) the trainer shows Strength 26, Physique 8, Adventure 6, Energy 8, and 4 in Memory, Charisma, Intelligence and Agility. The same screen lists 385.5 Health, 135.3 Stamina, 31 Physical Power and 1.2 Attack Speed. 59:47
- The gear at that point, all hovered at the forge: a +8 Swiftstep rune, a +8 Lifebloom undercoat and belt (Lifebloom 2/5, so the 3-piece bonus is off), a +8 Feralbond charm, a +5 Momentum ring and a +5 Tidestorm ring. The uploader calls this "plus eight gear just about". 59:32
- Early on, the starter gear is three Common +0 Lifebloom pieces: a rune (HP 8), an undercoat (HP 8) and a belt (Resistance 6). Together they give the 3-piece +30 HP. 17:40
- At 1:06:06 the uploader shows a second Minotaur Brawler at level 15 with "plus 11 everything". It wears a Common Lifebloom rune and undercoat, an Uncommon Lifebloom belt, a Rare Tidestorm charm and an Uncommon
 Gorehorn ring, all +11, and no second ring. Its attributes are Strength 33, Physique 9, Adventure 6, Energy 8 and 4 in the rest. 1:06:06
 - The level 15 character's spell bar holds
 Cornu Charge (Q), Quick Jab (E), Furious Strike (F) and Vortex (T). Its pet slot holds the wolf cub, Fangra Cub. The icon in the R slot does not match a spell icon we could check. 1:06:06
 - In the game files the Lifebloom rune has no main stat, but the video's Lifebloom runes show HP as their first line. The planner cannot hold that piece, so it is only in this note. 1:06:42
Changed since this video
- Furious Strike changed in game build 25546572, after the build the video shows.
- Whirl Of Gore changed in game build 25546572, after the build the video shows.
- Furious Strike Range Increase I changed in game build 25546572, after the build the video shows.
- Furious Strike Range Increase II changed in game build 25546572, after the build the video shows.
- Furious Strike Range Increase III changed in game build 25546572, after the build the video shows.
- Furious Strike no longer costs Health since game build 25546572 (0.107.7779). The three Health Cost Reduction nodes the video takes are now Furious Strike Range Increase I to III (+10% dash range each). They still lead to Rending Strike, and so do Cooldown Decrease II and III.
- In game build 25546572, Whirl of Gore's damage value went from 0.76 to 1.43, and its 0.5 second cooldown was removed.
Not shown in the video
The video does not show these, so this guide leaves them out.
- The Bleeding nodes for the last points. The video only says to search the tree for Bleeding.
- Amulets, badges and bracers. No piece in those slots is ever shown.
- The attribute spread at level 25. The video only says to keep putting points into Strength.
- A choice on Furious Strike Cooldown Decrease II and III.
Game version
The video went up on 2026-09-16. This wiki shows game build 25546572 (version 0.107.7779).
The version on screen in the video is game build 25325963.
The wiki read 3 game builds after that one. The changelog lists what they changed.